MongoDB'sData API is a way to access your MongoDB Atlas data using a REST-like interface. When enabled, the API creates a series of serverless endpoints that can be accessed without using native drivers. This API can be helpful when you need to access your data from an application that doesn't use those drivers, such as a bash script, a Google Sheet document, or even another database.
To explore the new MongoDB Data API, you can use the public Postman workspace provided by the MongoDB developer relations team.
In this article, we will show you how to use Postman to read and write to your MongoDB Atlas cluster. You will need to set up your Altas cluster and fork the Postman collection to start using it.
Prerequisites
- Set up an Atlas cluster
- Sign up for a free Postman account, and then sign in.
- Download and install the Postman desktop agent, which will enable you to use the web version of Postman
What You'll Learn
- Authorize the MongoDB Data API
- Insert, Find, Update, and Delete a document
- Perform operations on multiple documents
What You'll Build
- A Postman Collection with authorized API requests
Set up your MongoDB Atlas cluster
The first step to using the Data API is to create your own MongoDB Atlas cluster. If you don't have a cluster available already, you can get one for free. Follow the instructions from the documentation for the detailed directions on setting up your MongoDB Atlas instance.
Enable the Data API
Enabling the Data API on your MongoDB Atlas data collections is done with a few clicks. Once you have a cluster up and running, you can enable the Data API by following these instructions.
You can use the button below to open the fork in your Postman workspace or follow the instructions provided in this section.
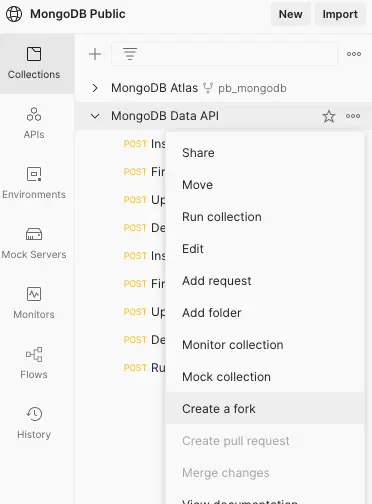
From the public MongoDB workspace on Postman, you will find two collections. The second one from the list, the MongoDB Data API, is the one you are interested in. Click on the three dots next to the collection name and select Create a fork from the popup menu.

Then follow the instructions on the screen to add this collection to your workspace. By forking this collection, you will be able to pull the changes from the official collection as the API evolves.
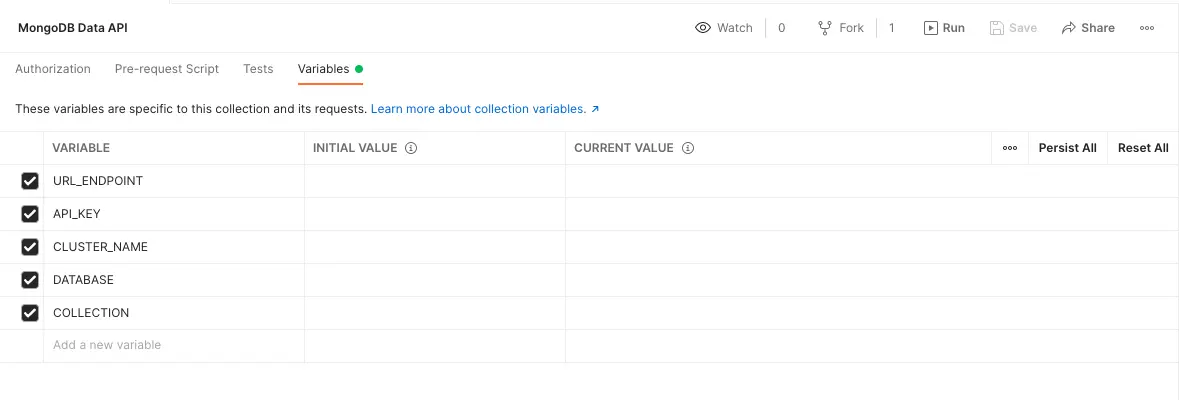
You will now need to configure your Postman collections to be ready to use your MongoDB collection. Start by opening the Variables tab in the Postman collection.

You will need to fill in the values for each variable. If you don't want the variables to be saved in your collection, use the Current value column. If you're going to reuse those same values next time you log in, use the Initial value column.
For the URL_ENDPOINT variable, go to the Data API screen on your Atlas cluster. The URL endpoint should be right there at the top. Click on the Copy button and paste the value in Postman.

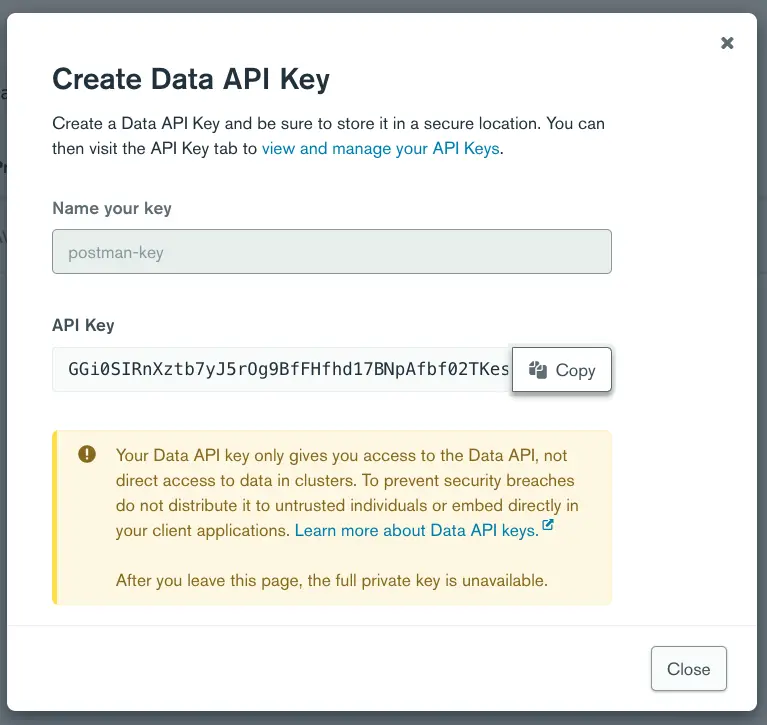
Next, for the API_KEY, click on Create API Key. This will open up a modal window. Give your key a unique name and click on Generate Key. Again, click on the Copy button and paste it into Postman.

Now fill in the CLUSTER_NAME with the name of your cluster. If you've used the default values when creating the cluster, it should be Cluster0. For DATABASE and COLLECTION, you can use an existing database if you have one ready. If the database and collection you specify do not exist, they will be created upon inserting the first document.
Once you've filled in those variables, click on Save to persist your data in Postman.
You are now ready to use the Data API from your Postman collection.
Insert a document
Start with the first request in the collection, the one called "Insert Document."
Start by selecting the request from the left menu. If you click on the Body tab, you will see what will be sent to the Data API.
{
  "dataSource": "{{CLUSTER_NAME}}",
  "database": "{{DATABASE}}",
  "collection": "{{COLLECTION}}",
  "document": {
    "name": "John Sample",
    "age": 42
  }
}
Here, you can see that we are using the workspace variables for the cluster, database, and collection names. The document property contains the document we want to insert into the collection.
Now hit the blue Send button to trigger the request. In the bottom part of the screen, you will see the response from the server. You should see something similar to:
{ "insertedId": "61e07acf63093e54f3c6098c" }
This insertedId is the id value of the newly created document. If you go to the Atlas UI, you will see the newly created document in the collection in the data explorer. Since you already have access to the Data API, why not use the API to see the inserted value?
Find a document
Select the following request in the list, the one called "Find Document." Again, you can look at the body of the request by selecting the matching tab. In addition to the cluster, database, and collection names, you will see a filter property.
{
  "dataSource": "{{CLUSTER_NAME}}",
  "database": "{{DATABASE}}",
  "collection": "{{COLLECTION}}",
  "filter": { "name": "John Sample" }
}
The filter is the criteria that will be used for the query. In this case, you are searching for a person named "John Sample."
Click the Send button again to trigger the request. This time, you should see the document itself.
{
  "document": {
    "_id": "61e07acf63093e54f3c6098c",
    "name": "John Sample",
    "age": 42
  }
}
You can use any MongoDB query operators to filter the records you want. For example, if you wanted the first document for a person older than 40, you could use the $gt operator.
{
  "dataSource": "{{CLUSTER_NAME}}",
  "database": "{{DATABASE}}",
  "collection": "{{COLLECTION}}",
  "filter": { "age": { "$gt": 40 } }
}
This last query should return you the same document again.
Update a document
Say you made a typo when you entered John's information. He is not 42 years old, but rather 24. You can use the Data API to perform an update. Select the "Update Document" request from the list on the left, and click on the Body tab. You will see the body for an update request.
{
  "dataSource": "{{CLUSTER_NAME}}",
  "database": "{{DATABASE}}",
  "collection": "{{COLLECTION}}",
  "filter": { "name": "John Sample" },
  "update": { "$set": { "age": 24 } }
}
In this case, you can see a filter to find a document for a person with the name John Sample. The update field specifies what to update. You can use any update operator here. We've used $set for this specific example to change the value of the age field to 24. Running this query should give you the following result.
{ "matchedCount": 1, "modifiedCount": 1 }
This response tells us that the operation succeeded and that one document has been modified. If you go back to the "Find Document" request and run it for a person older than 40 again, this time, you should get the following response.
{ "document": null }
The null value is returned because no items match the criteria passed in the filter field.
Delete a document
The process to delete a document is very similar. Select the "Delete Document" request from the left navigation bar, and click on the Body tab to see the request's body.
{
  "dataSource": "{{CLUSTER_NAME}}",
  "database": "{{DATABASE}}",
  "collection": "{{COLLECTION}}",
  "filter": { "name": "John Sample" }
}
Just as in the "Find Document" endpoint, there is a filter field to select the document to delete. If you click on Send, this request will delete the person with the name "John Sample" from the collection. The response from the server is:
{ "deletedCount": 1 }
So you can see how many matching records were deleted from the database.
So far, we have done each operation on single documents. The endpoints /insertOne, /findOne, /updateOne, and /deleteOne were used for that purpose. Each endpoint has a matching endpoint to perform operations on multiple documents in your collection. You can find examples, along with the usage instructions for each endpoint, in the Postman collection.
Some of those endpoints can be very helpful. The /find endpoint can return all the documents in a collection, which can be helpful for importing data into another database. You can also use the /insertMany endpoint to import large chunks of data into your collections.
However, use extreme care with /updateMany and /deleteMany since a small error could potentially destroy all the data in your collection.
Aggregation Pipelines
One of the most powerful features of MongoDB is the ability to create aggregation pipelines. These pipelines let you create complex queries using an array of JSON objects. You can also perform those queries on your collection with the Data API.
In the left menu, pick the "Run Aggregation Pipeline" item. You can use this request for running those pipelines. In the Body tab, you should see the following JSON object.
{
  "dataSource": "{{CLUSTER_NAME}}",
  "database": "{{DATABASE}}",
  "collection": "{{COLLECTION}}",
  "pipeline": [
    {
      "$sort": { "age": 1 }
    },
    {
      "$limit": 1
    }
  ]
}
Here, we have a pipeline that will take all of the objects in the collection, sort them by ascending age using the $sort stage, and only return the first return using the $limit stage. This pipeline will return the youngest person in the collection.
If you want to test it out, you can first run the "Insert Multiple Documents" request to populate the collection with multiple records.
There you have it! A fast and easy way to test out the Data API or explore your MongoDB Atlas data using Postman. If you want to learn more about the Data API, check out the Atlas Data API Introduction blog post. If you are more interested in automating operations on your Atlas cluster, there is another API called the Management API. You can learn more about the latter on the Automate Automation on MongoDB Atlas blog post.
This tutorial discusses the preview version of the Atlas Data API which is now generally available with more features and functionality. Learn more about the GA version here.